
Retention Centre
Overview
The Retention Centre is a dashboard to identify students who might be at risk in your cohort. It focuses on four main parameters (by default) to find at-risk students. The parameters can be tuned to fit your context and to identify students who might be struggling. Once students are identified in the dashboard, it is possible to email individual students or bulk email students who meet a particular risk factor.
Examples of questions that this dashboard can answer include:
- Which students are considered at-risk in my cohort?
- Are students regularly participating in the activities within vUWS?
How do I use the report?
Access the report
Access the Retention Centre in your vUWS site by scrolling down to the Subject Management section in the navigation menu, then selecting Retention Centre .
Overview of the Interface
This section provides a brief overview of the interface to orientate you with the function and features of the Retention Centre. Scroll down for a more detailed break down of each section and how to use it.
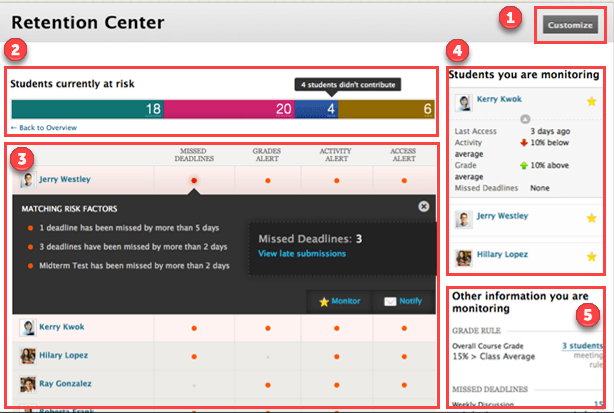
- Customise: The Retention Centre had four types of risk parameters, or rules, with specific criteria set for them. These rules can be customised to align the Retention Centre to the contextual needs, that is the learning design for the subject and other desired parameters. Click this button to access the rules and customise them.
- Risk Bar: A summary of the at-risk students in the subject.
- Risk Table: A list of students in the subject who are considered at-risk. The orange dots indicate which alert is triggering the student as at-risk.
- Students you are monitoring: A list of students in the subject who have been manually marked by an instructor to be monitored.
- Other information you are monitoring: This section will display custom rules that have been created that are excluded from the risk table but of interest to the instructor.
Customise the Retention Centre
The Retention Centre allows the instructor to customise the risk parameters, or rules, with specific criteria. These rules can be used for either the Risk table to identify at-risk students or for the Other information you are monitoring section to monitor who is doing well, for example.
The Retention Centre has four rule types available (Missed Deadlines, Grades Alert, Activity Alert and Access Alert). Within each rule, the criteria can be customised to align to the contextual needs. By default, the Retention Centre uses all four available rules and has default criteria set up for each rule. Multiple rules can be setup for each rule type, this enables more customisability and fine tuning. For example, multiple grade rules could be created where a rule exists for each assessment within the subject.
- Subject Access Rule relates to the subject accesses in the unit, that is the logins to the specific vUWS site, and the rule is based on the date users last accessed the subject. Students who have not logged in for a defined number of days trigger the notification system.
- Subject Activity Rule relates to the overall activity (interaction) within the subject that is compared to a threshold. Students who are below or above a defined level of activity trigger the notification.
- Grade Rule relates to the grade in a specific grade column or overall grade. Students who score above or below the defined threshold trigger the notification system.
- Missed Deadline relates to a specific item or all subject deadlines and identifies the students that have not submitted by the due dates. Students who do not complete the activity by the due date criteria trigger an alert.
It is possible to edit the existing rules or delete the existing rules and start fresh. The recommended workflow is to delete the rules you do not align to your subject and then edit the existing rules.
For example, for your subject you may wish to use the Subject Access Rule and Subject Activity Rule, however, for the Grade Rule and Missed Deadline Rule you only want it on specific assessment items rather than across all items. In this case:
- Delete the Default Grade Rule and Default Missed Deadline Rule
- Modify the Subject Access Rule and Subject Activity Rule
Edit a Rule
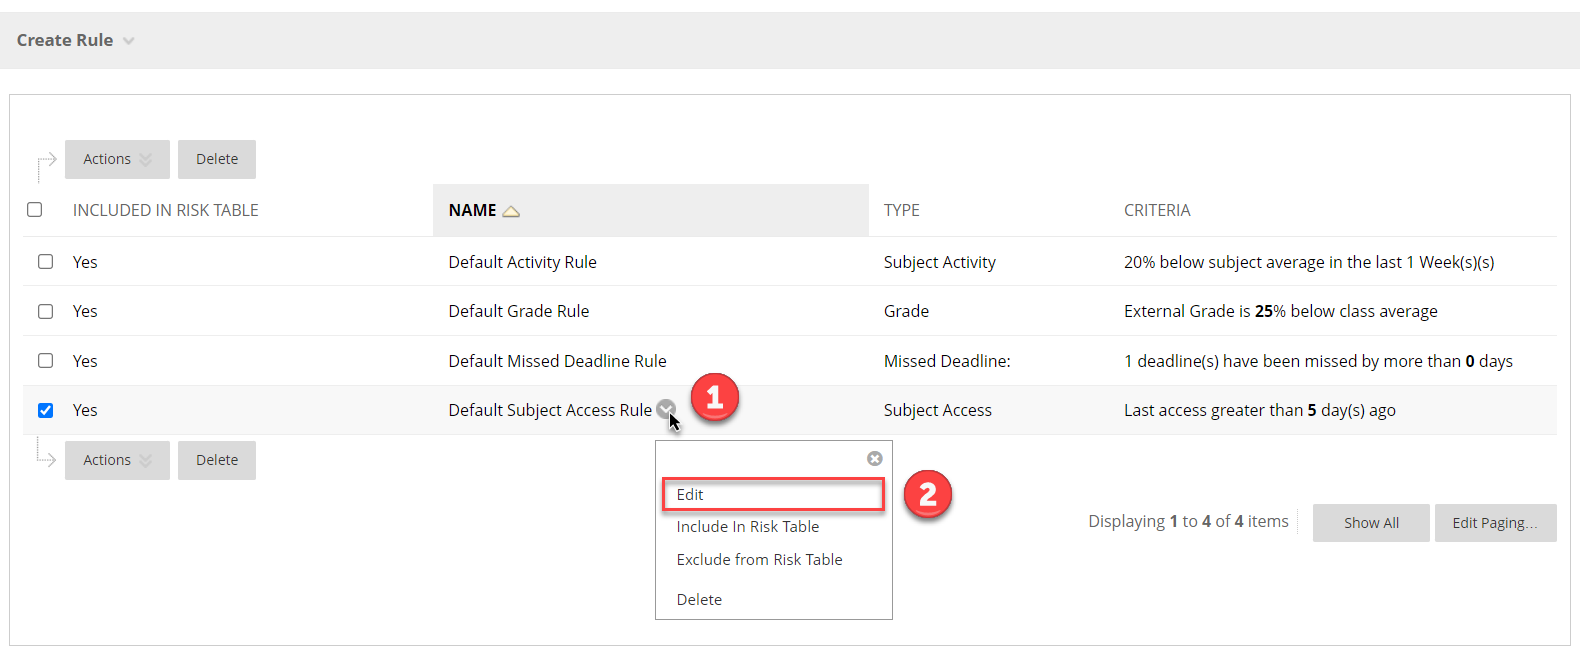
Any rule in the Retention Centre can be edited. This allows you to make changes to the specific criteria within a rule to fit with your context. To edit a rule:
- Access the Customise Retention Centre section by clicking on the Customise button
- Hover your mouse over the rule you wish to edit
- Access the contextual menu by clicking on the chevron icon
- Select Edit from the menu
- A new page will load where you can make changes to the criteria of the selected rule
Delete a Rule
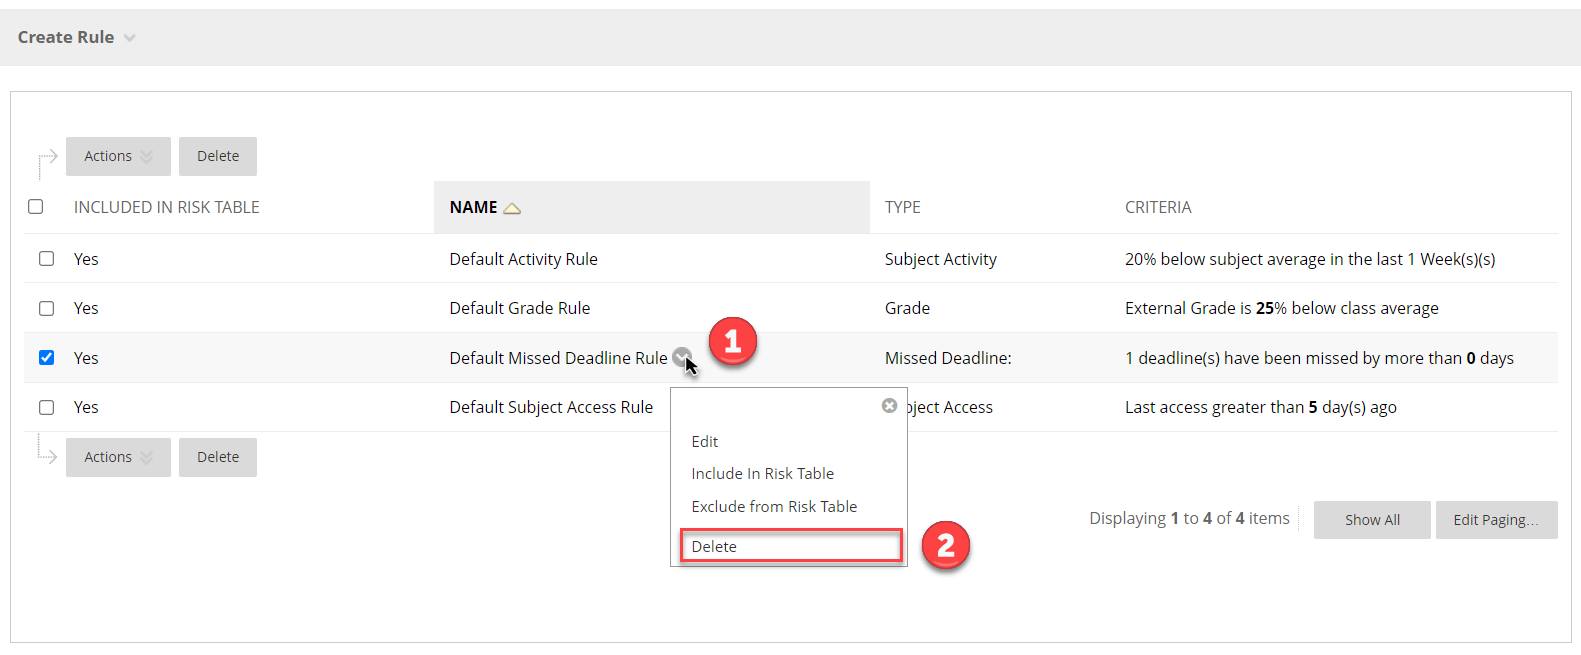
The Retention Centre allows instructors to delete rules that you no longer wish to keep. To delete a rule:
- Access the Customise Retention Centre section by clicking on the Customise button
- Hover your mouse over the rule you wish to delete
- Access the contextual menu by clicking on the chevron icon
- Select Delete from the menu
- A dialog will appear to confirm that you wish to delete the rule, click on OK
- The rule will now be permanently deleted
Create new Rule
New rules can be created in the Retention Centre to cater for variations in instructor needs and subject contexts.
It is worth noting that multiple rules of the same type can be created which provides flexibility. For example, you may have weekly formative quizzes for students that don’t contribute to the final grade but also have two online assessments that do contribute to the final grade. In this case, you may not want all assessment items to be included in the Missed Deadline rule. In this case, you might create a Missed Deadline rule for the two online assessments.
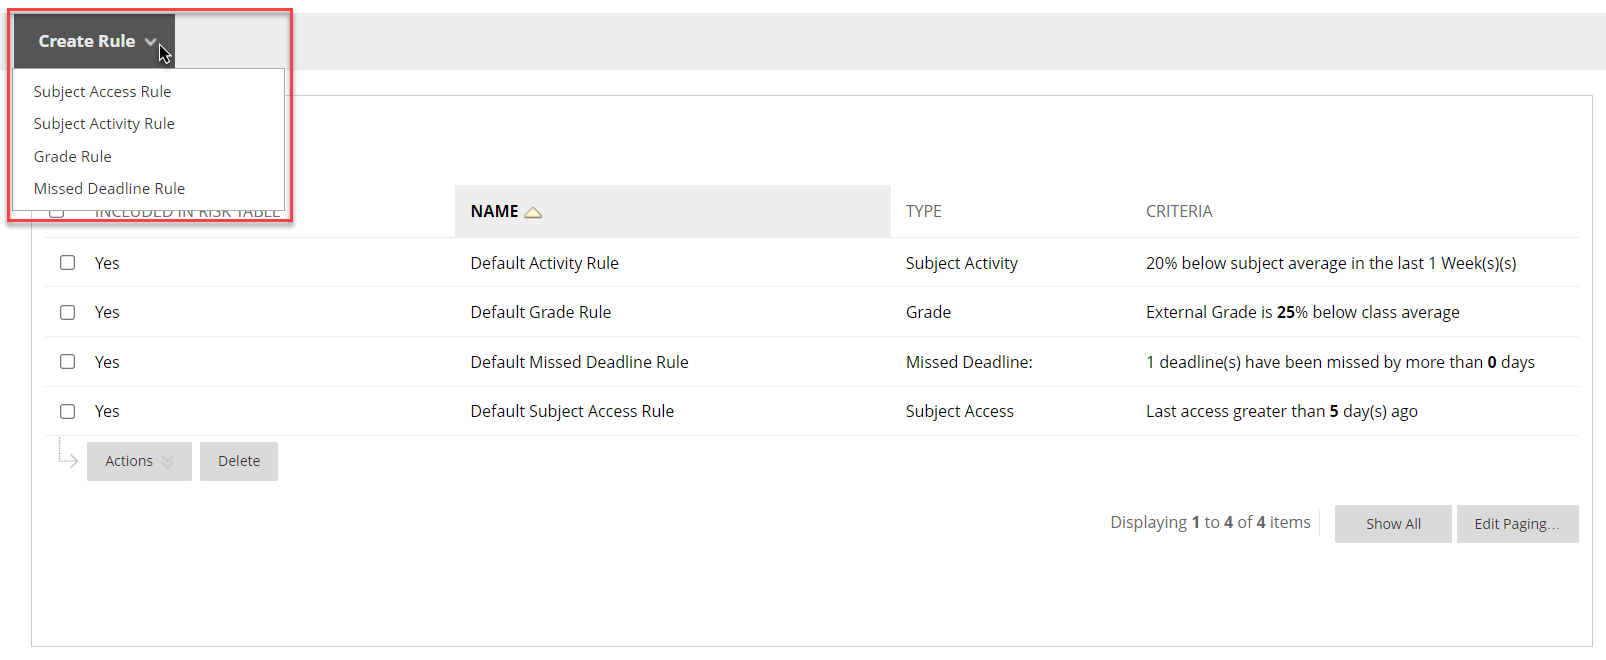
To create a new rule in the Retention Centre:
- Access the Customise Retention Centre section by clicking on the Customise button
- Hover your mouse over the Create Rule button up the top left
- Select the type of Rule you wish to create
Monitor and Contact Students
There are a number of ways you can monitor and contact students through the Retention Centre. The following section will explore monitoring and contacting students manually through the Risk Bar and Risk Table, and how you are able to flag and monitor specific students through these areas.
It is worth noting, that if you would like to contact multiple students (bulk contact), you will need to use the Risk Bar.
Exploring data using the Risk Bar
The Risk Bar provides a visual summary of the students in the subject who are at-risk. It shows the total number of students who are considered at-risk and the bar visualisation displays this number in contrast to the number of students in the cohort.

The Risk Bar can be clicked on to drill down into this data. Once clicked on, the bar will change and display a breakdown of the number of students who are at-risk based on the individual alerts. The alerts are made up of all the rules which contribute to this alert. Note that individual students can appear across multiple alerts, thus the total number on the drill down down not equate to the total number of students who are at-risk.

The individual alerts can be clicked on to view the specific rules that relate to this alert and how many students have been flagged by the rule.
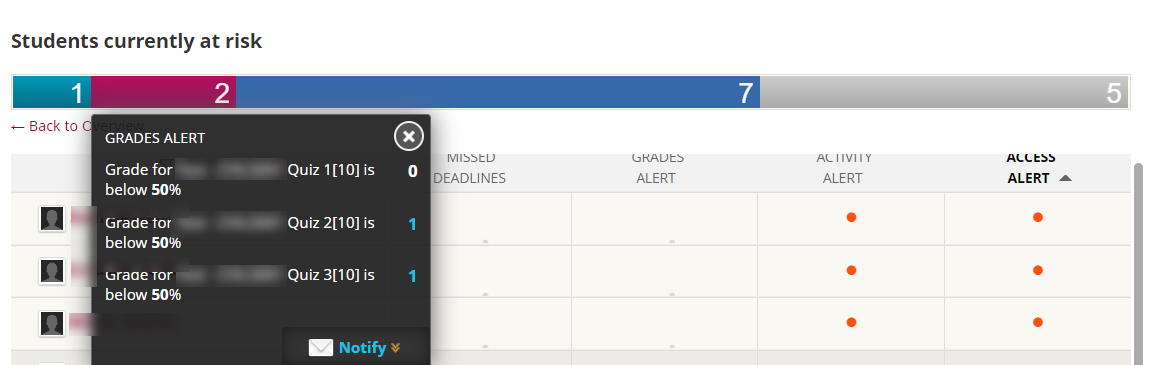
Contact Multiple Students (Bulk Contact) using the Risk Bar
The Retention Centre enables an instructor to contact multiple students through the Risk Bar.
Click on the total number of students at risk on the Risk Bar to drill down on the data (as outlined in the previous section), then click on the alert you wish to contact students based on.
This will open a dialog box that lists the rules related to the specific alert. From this dialog, hover your mouse cursor over the Notify menu and then select Students .
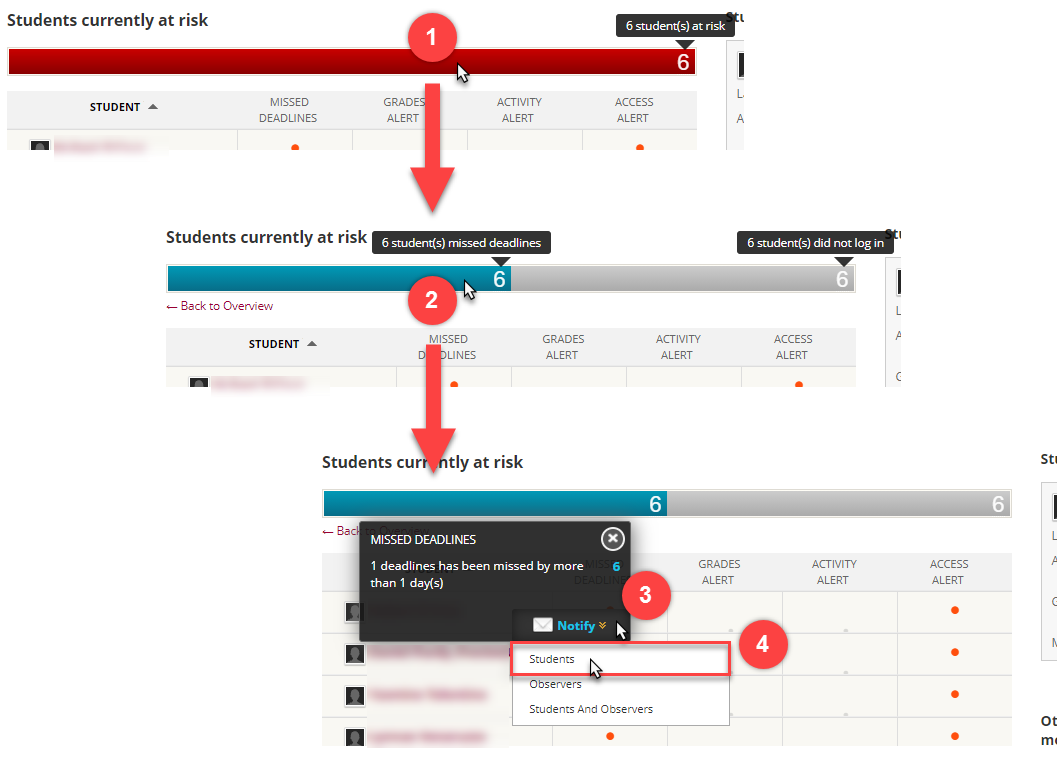
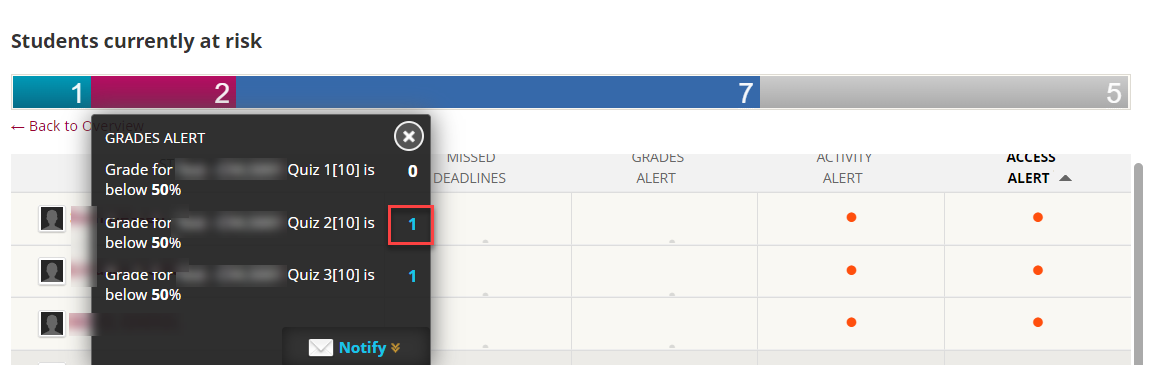
Alternatively, you can contact the students who have been flagged by a particular rule rather than by the overall alert (that is, a subset of the total students flagged by the alert) by clicking on the number of students corresponding to the rule.
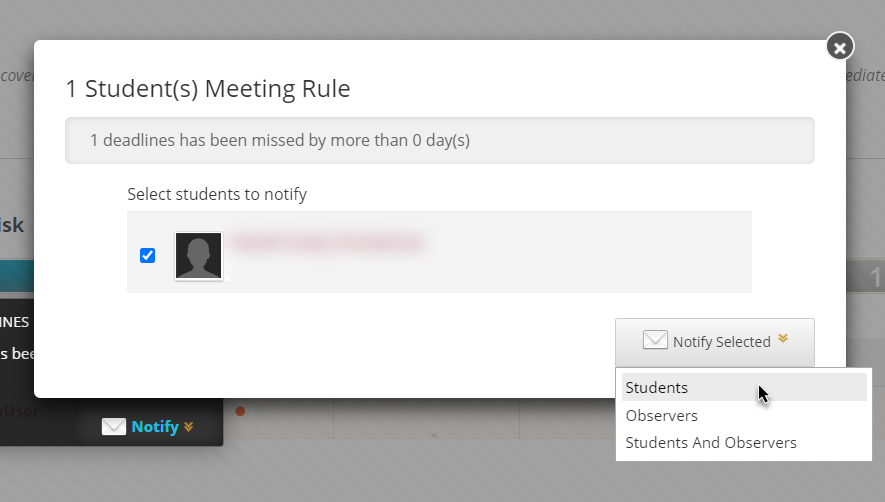
This will open a dialog where you can individually select/deselect students and email the students on a particular rule – this can be useful in emailing students who have not yet submitted an assessment, for example.
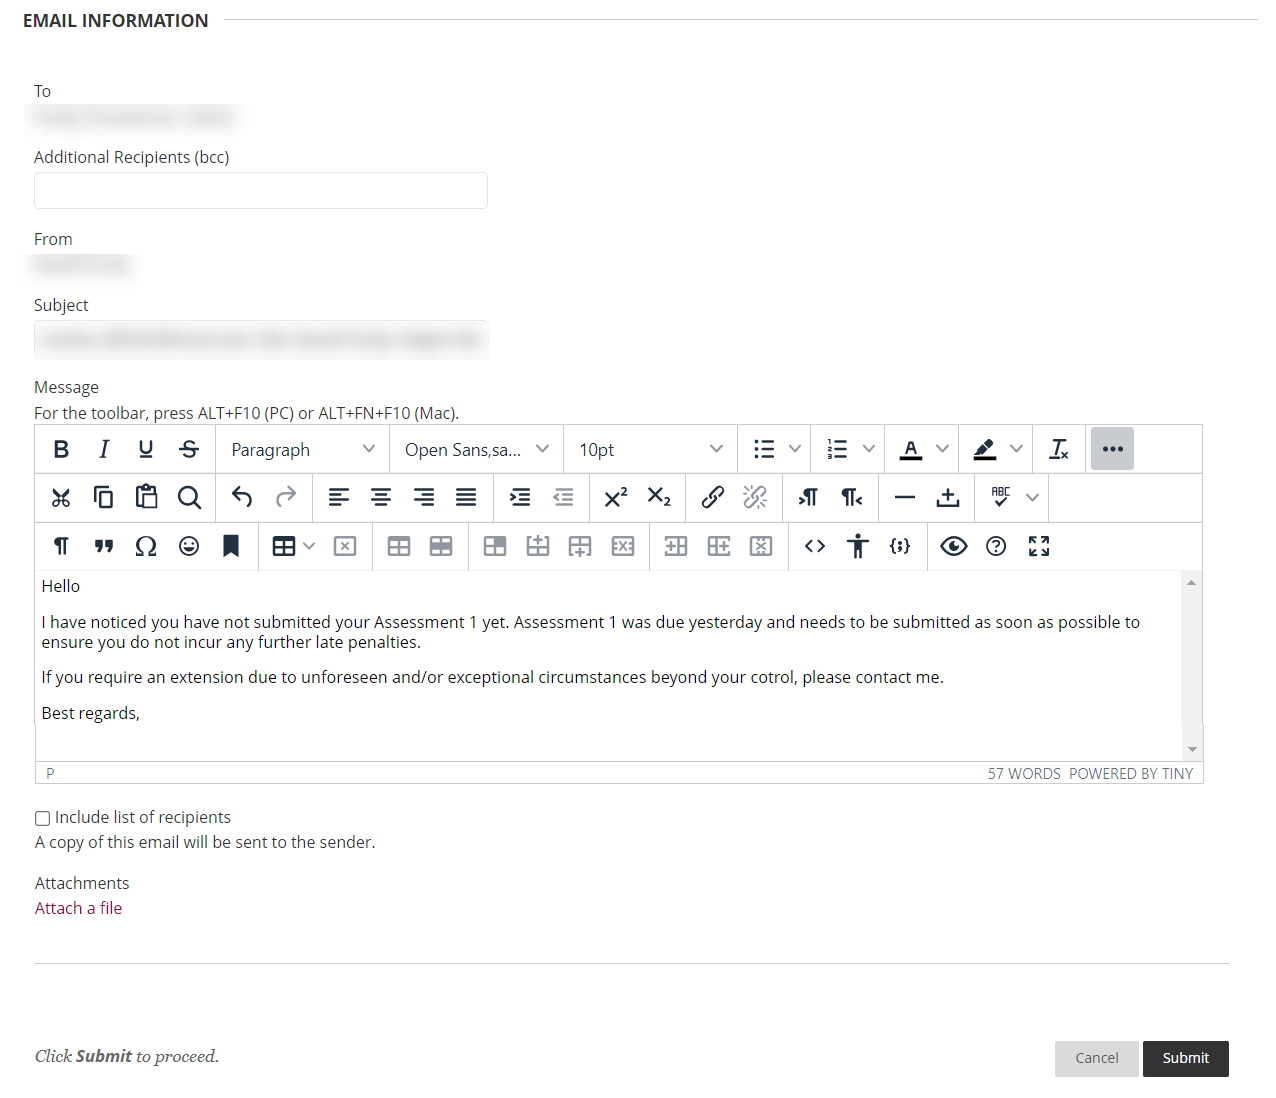
Either way, you will be taken to a bulk email tool. The following screenshot illustrates how you might compose an email. In this tool ensure you:
- Add a meaningful subject
- Inform students why they are being contacted
- Give students a suggestion of what to do next to rectify the issue
Note : Students who are in the list to receive the email will not see the names of the other students receiving this email . The To addresses are hidden once the student receives the email.
Exploring data using the Risk Table
The Risk Table generates a list of students within the subject who are considered at-risk. A student is considered at-risk when they meet the criteria of a single rule. The orange dots in the table indicate which alert (alerts are comprised of multiple rules that fall under the same rule type) is triggering the student as at-risk.
There are four categories which make up the alerts: Missed Deadlines, Grades Alert, Activity Alert and Access Alert
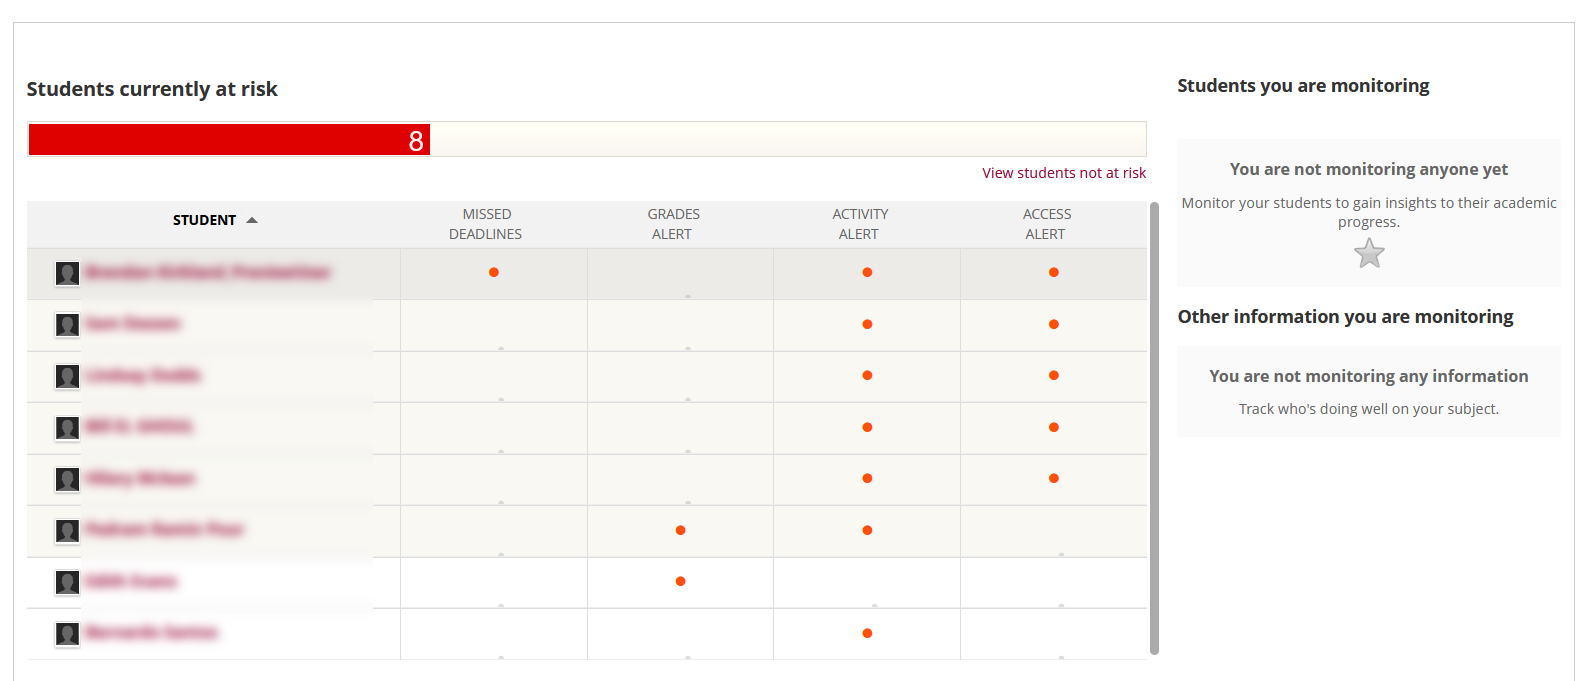
The Retention Centre Risk Table enables the instructor to drill down into the data in a number of ways revolving around individual students.
View the individual Student Retention Status
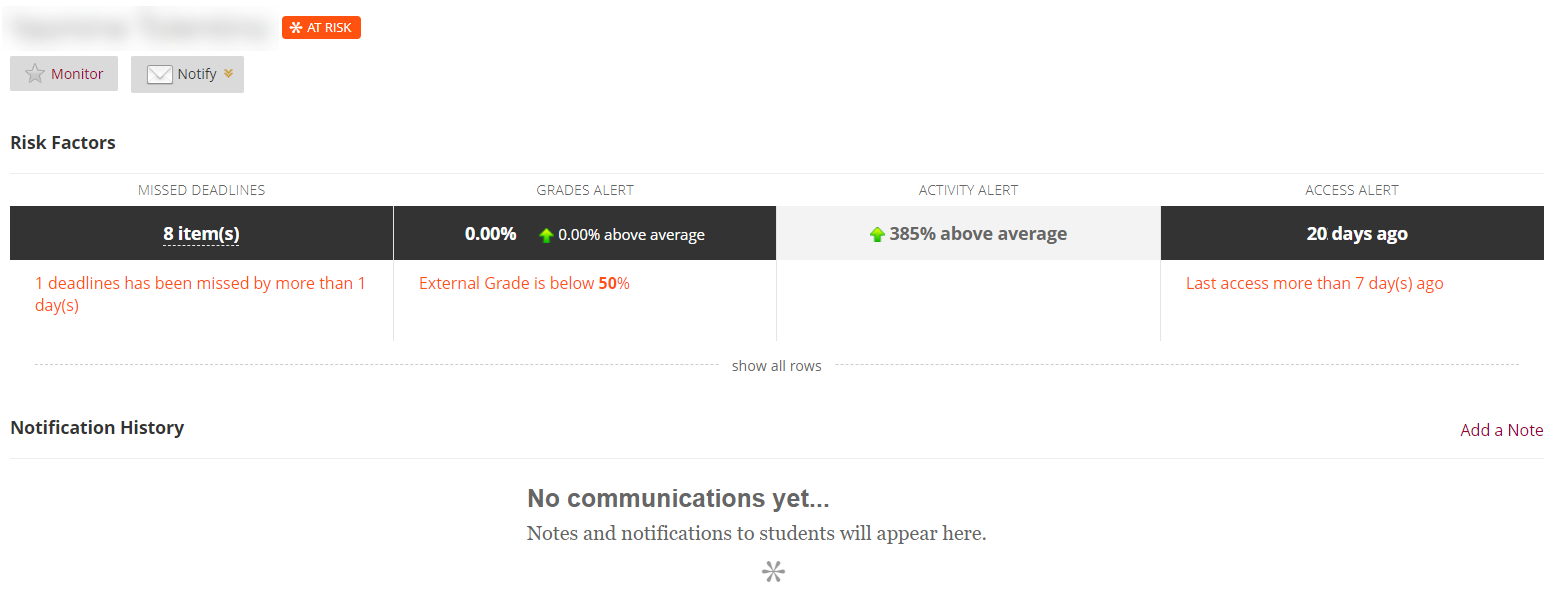
From the Retention Centre Risk Table, click on an individual student name. This will drill down to the Retention Status for that student. This page indicates whether the student is at-risk and which Risk Factors contribute to this status.
It is also possible to add the student to the list of students you are monitoring – click on the Monitor button under the student name, or contact the student directly from this screen – hover over the Notify menu and click Students.
The final drill down into this data is to view the list of deadlines the student has missed. Click on the number of missed deadlines in the table of data. A dialog will appear that lists all the missed deadlines.
Contact an Individual Student
In the Risk Table you are able to drill down onto the specific alerts for an individual student. This will enable you to add them to the monitor list or contact that student.
Click on the orange dot that corresponds to the alerts for a student. This will open a drop down that, on the left, describes the reason the student is being flagged and, on the right, the data that corresponds to the student being flagged.
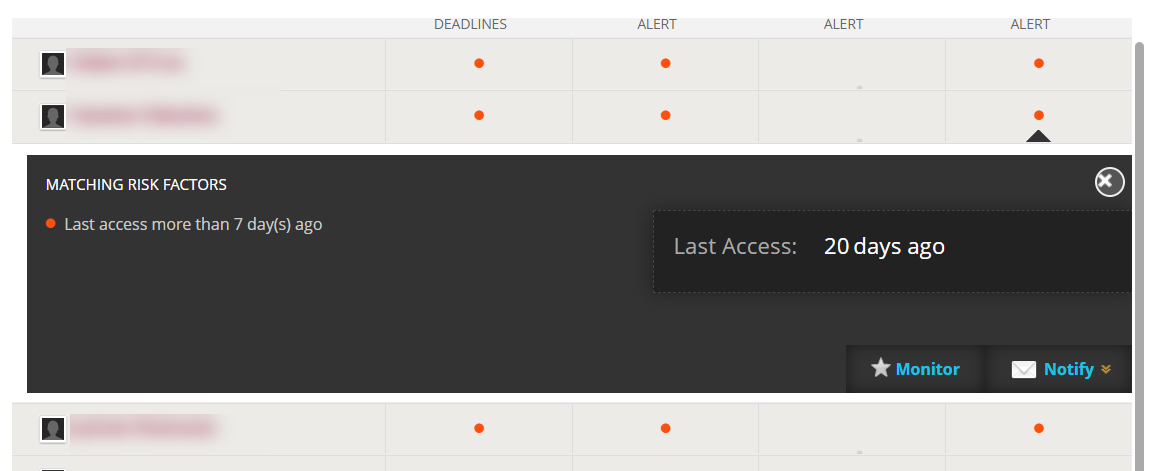
From this dialog it is possible to add the student to the list of students you are monitoring. To do this, click on the Monitor button which is located at the the bottom right of the dialog.
It is also possible to contact the student directly from this screen – hover over the Notify menu which is located at the bottom right of the dialog and click Students.
The following screenshot illustrates how you might compose an email. In this tool ensure you:
- Add a meaningful subject
- Inform student why they are being contacted
- Give the student a suggestion of what to do next to rectify the issue
